
|
|
|
|
|
NOTE: To make use of this section, you'll need JJFFE v2.2 or newer. You can get this from John Jordan's site. All combateers have flown on manual control - it's really required to be able to do combat at all. However, most have only performed combat with basic manual control, a mode that comes with all ships. Basic manual control gives you six degrees of freedom: yaw left/right (or roll, depending on your preference), pitch up/down and thrust forwards/reverse. On the face of it, this sounds pretty good: you can point your ship at the enemy using a combination of pitch and yaw, then bring yourself closer by operating the main thruster - or slow your relative closure by operating the retros. Or even flip over and fight with the rear laser, using the main thruster to prevent the enemy from overtaking you. But full manual control is something else. Full manual control gives you a further four degrees of freedom - slide up/down, and slide left/right. Combined with thrust/retro and yaw and pitch, you have a staggering combination of manoevres you can pull off. For instance, you can thrust, pitch, slide up and right all at the same time, whilst yawing too. Against the normal run of the mill enemy, this gives you a serious advantage. However, you must know how to use the thrusters effectively. These instructions will hopefully equip you with the skills and the knowledge you need to use full manual control to gain the rightfully respected Elite rating.
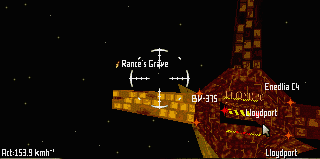
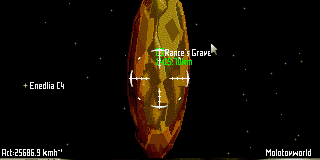
To learn the basics, we'll use an asteroidal body, Rance's Grave, in Enedlia. It orbits Molotovworld in the Enedlia system. This asteroid is a good practise ground because the "Relative To" lock on your ship never locks to the asteroid - it always remains at Molotovworld. This means that if you follow the vector sight (the small sight on your ship which indicates direction relative to whatever is the Relative To object) or the speed meter you're in a world of hurt. Instead you must think relative to Rance's grave, and ignore these displays. First I will discuss what the various controls do in full manual mode, then we'll go on the exercise. The side and top/bottom thrusters are actually pretty powerful - usually somewhere in the region of the ship's retros. The first principle for the kind of flying we're about to do is small corrections. Don't lean on a thruster for a long time. Just quick taps on the appropriate thruster control are required. Firstly, the standard manual setup - or "Jordanian Controls", consist of the following. In the commander's left hand are the thrust controls - main, retro, left, right, bottom and top. In the commander's right hand is the pitch/yaw (or roll, depending on your preferences) control - normally a mouse, since this gives the greatest amount of aiming precision. Secondly, if you've not yet become used to the fact that your direction of travel is not necessarily where your nose is pointed, you need to learn this on an 'internal' level now - you need to grok it. Hopefully, this excercise will help you understand it at a deep, subconcious level. It is quite alien to anyone who's only used to flying in an atmosphere, or maybe only moving on the ground on a planet. I suggest you repeat this excercise until you can fly around Rance's Grave without even thinking. You should be doing this automatically - without having to think which control to operate - before you throw yourself into a combat situation. Otherwise, you're probably dead meat. Or dead cyborg, depending on whether you are organism or machine. The control layout itself is simple. Put your right hand on the pitch/yaw control (mouse) and use it as normal. Put your left hand over the thruster controls (the numeric keypad). My preference is to use the 5 and 8 key as the main thrust and retro thrust keys respectively. My middle finger commands the main and retros. This leaves my index finger free to press the 9 key, which fires the left thruster (making the ship move to the right). Finger 4 can then hit the 7 key, which fires the right thruster, moving the ship to the left. This finger can be slid down to 4 and 1, which operate the bottom and top thrusters respectively. Alternatively, the index finger can be slid down to the 6 and 3 keys to do the same job. Or you can angle your keyboard such that you can get the 4 and 1 keys with your pinky. If you're a lifeform with long, flexible fingers (or better still, tentacles) you may find it easier.
Now for the fun bit, the practical part of the lesson. Remember the laws of motion as put down by our old friend Sir Isaac Newton - every action has an equal and opposite reaction. This means if we fire the left thruster, we'll move right. Press the external view key, and experiment a bit - fire various thrusters and watch which way the ship moves. On most ships, you can easily see the thrusters firing. The Jordanian controls are quite intuitive - if you press the 7 key (the leftmost key in the left/right controls) this will cause the ship to move left. Remember that there's no friction in space, so until you press the 9 key for an equal duration, you'll keep moving left - you won't just come to a stop like you would if you were in an atmosphere. This will become very clear during our flight exercise. Without further ado, let's launch. Here is an accompanying savegame for this exercise: If you used the savegame, when you hit launch, you'll find yourself stationary in the docking tube. This is because I set the ship to full manual mode ("Engines Off") before docking and saving the game. Leave the engines in this mode. To move out of the docking tunnel, press the main thruster key (keypad 8). Don't press it for long - just press it long enough until you are going about 300 km/h. For variety, you might like to rotate the ship so the nose is pointing at the wall. If you rotate left to point at the wall, press the key for the left thruster (keypad 9) and you'll start to move out of the docking port. Don't blame me if control gets mad at you, you're the pilot in command, so I didn't mention this to you, right?
Note: FFE doesn't calculate the surface of non-spherical objects like asteroids very well, so you can end up sinking through the surface before crashing. Treat the ground as a hard deck, and try not to fly through it :-)
| |||||||||

|
|